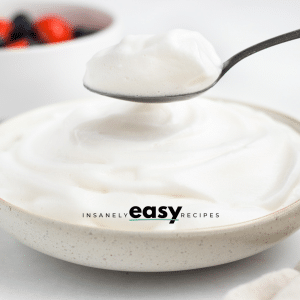
Aquafaba Whipped Cream
Learn how to make heavenly Aquafaba Whipped Cream with this simple, four-ingredient recipe! This recipe is a game-changer for those following a vegan or dairy-free lifestyle and allows you to still enjoy fluffy whipped cream that tastes just like the real thing.
Ingredients
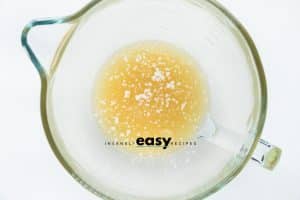
- The liquid from 2 15-oz cans of chickpeas
- ¼ tsp cream of tartar
- 2/3 cup powdered sugar
- 1 ½ tsp vanilla extract
Instructions
- Gather your ingredients, then add the chickpea liquid and cream of tartar to the bowl of an electric stand mixer with the whisk attachment fitted.
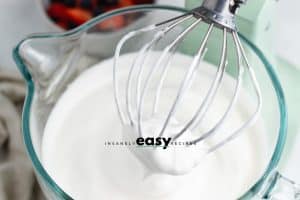
- Whisk for 6-8 minutes, starting slowly and gradually increasing the speed to high, until white and fluffy with stiff peaks formed.
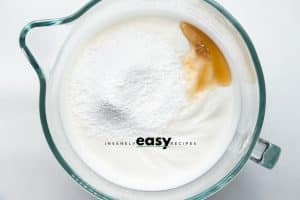
- Sift in the powdered sugar and add the vanilla extract. Whisk for another minute until well combined.
Notes
Choose the Right Aquafaba: Use the liquid from canned chickpeas, preferably unsalted and without added preservatives.
Chilled Equipment: Help stabilize your Aquafaba Whipped Cream by chilling your mixing bowl and beater in the refrigerator for 15-30 minutes before mixing. You can also use an electric hand whisk to make this if preferred.
Gradually Add Sweetener: Incorporate powdered sugar slowly into the whipped aquafaba while continuing to beat. Adding it gradually ensures that the sugar dissolves properly and avoids any graininess in the final product. Adjust the sweetness level according to your preference.
Storage Tips: Aquafaba Whipped Cream is best enjoyed immediately. However, if you have leftovers, store them in an airtight container in the refrigerator for up to 24 hours. Keep in mind that the texture may deflate slightly upon refrigeration, but it can still be enjoyed as a creamy topping. You can also freeze this to make your own vegan cool whip.
Serving Tips: Serve this over fresh berries or as a topping for your favorite pies, tarts, or cakes.